NextCloud
Jail Creation
bastille create nextcloud 14.2-RELEASE 10.0.0.20/8 bastille0Installation
Database
We use mariadb as the database for NextCloud since it is the best supported option.
bastille pkg nextcloud install mariadb1011-server
bastille sysrc nextcloud mysql_enable=YES
bastille service nextcloud "mysql start"
To set up the database we connect to the mariadb instance in the jail. Use an empty password if promted:
bastille cmd nextcloud mysql -u root -PThen, in the shell that opens, enter the following SQL commands. Replace changeme with a password of your choice. Be sure to use the ip address of the nextcloud jail as host for the nextcloud use (the part after the @).
CREATE DATABASE nextcloud;
CREATE USER 'nextcloud'@'10.0.0.20' IDENTIFIED by 'changeme';
GRANT ALL PRIVILEGES ON nextcloud. * TO 'nextcloud'@'10.0.0.20';
GRANT ALL PRIVILEGES ON *.* TO 'nextcloud'@'10.0.1.20' IDENTIFIED BY 'changeme' WITH GRANT OPTION;
--- exit the shell
exit
Nextcloud
Thankfully, we have a nextcloud package for FreeBSD which installs all the dependencies and puts all application files at /usr/local/www/nextcloud. We still need to install the SQlite PDO adapter, since this is required by Nextcloud Collectives.
bastille pkg nextcloud install nextcloud-php83 php83-pdo_sqliteWebserver
Now we need a way to serve the Nextcloud files. Apache is often used for this, but we opt again for Caddy, since using it with PHP-FPM is dead simple.
bastille pkg nextcloud install caddyEdit the Caddyfile of the nextcloud jail:
micro /usr/local/bastille/jails/nextcloud/root/usr/local/etc/caddy/CaddyfileNote
Alternatively, you can also install an editor in the nextcloud jail and use bastille cmd nextcloud micro /usr/local/etc/caddy/Caddyfile to edit the file.
Use the following Configuration:
|
|
PHP Configuration
Use the production template as a starting point:
cp /usr/local/etc/php.ini-production /usr/local/etc/php.iniChange the following values in the newly created php.ini
|
|
Caching
The FreeBSD Nextcloud package allready set up APCu for local caching. We want to improve on it by using redis.
First, install redis, enable and start it:
bastille pkg nextcloud install redis
bastille sysrc nextcloud redis_enable=YES
bastille service nextcloud 'redis start'
Due to Localhost Pitfalls in Jails, we need to bind redis to the ip address of the jail. Edit the following two values in /usr/local/etc/redis.conf
|
|
Now we are ready to adapt nextclouds caching settings in /usr/local/www/nextcloud/config/config.php. Change the following values in this file:
|
|
Reverse-Proxy
TODO: Add caddy config
NextCloud Configuration
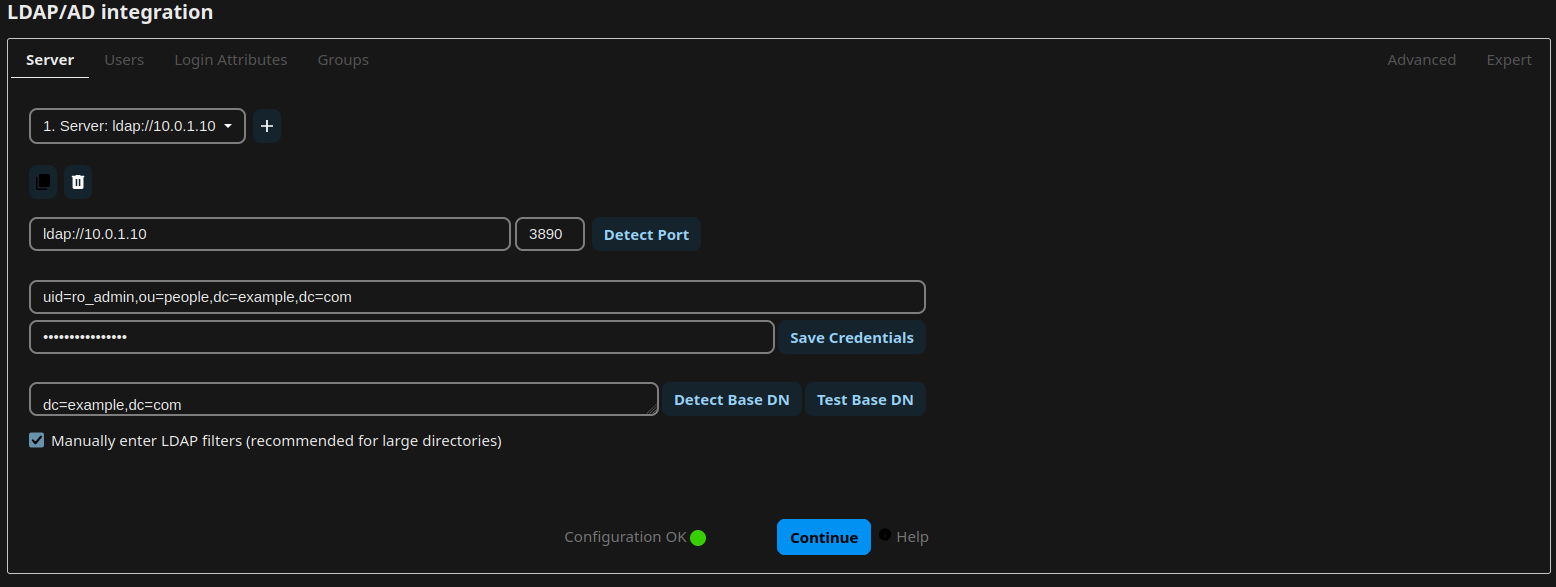
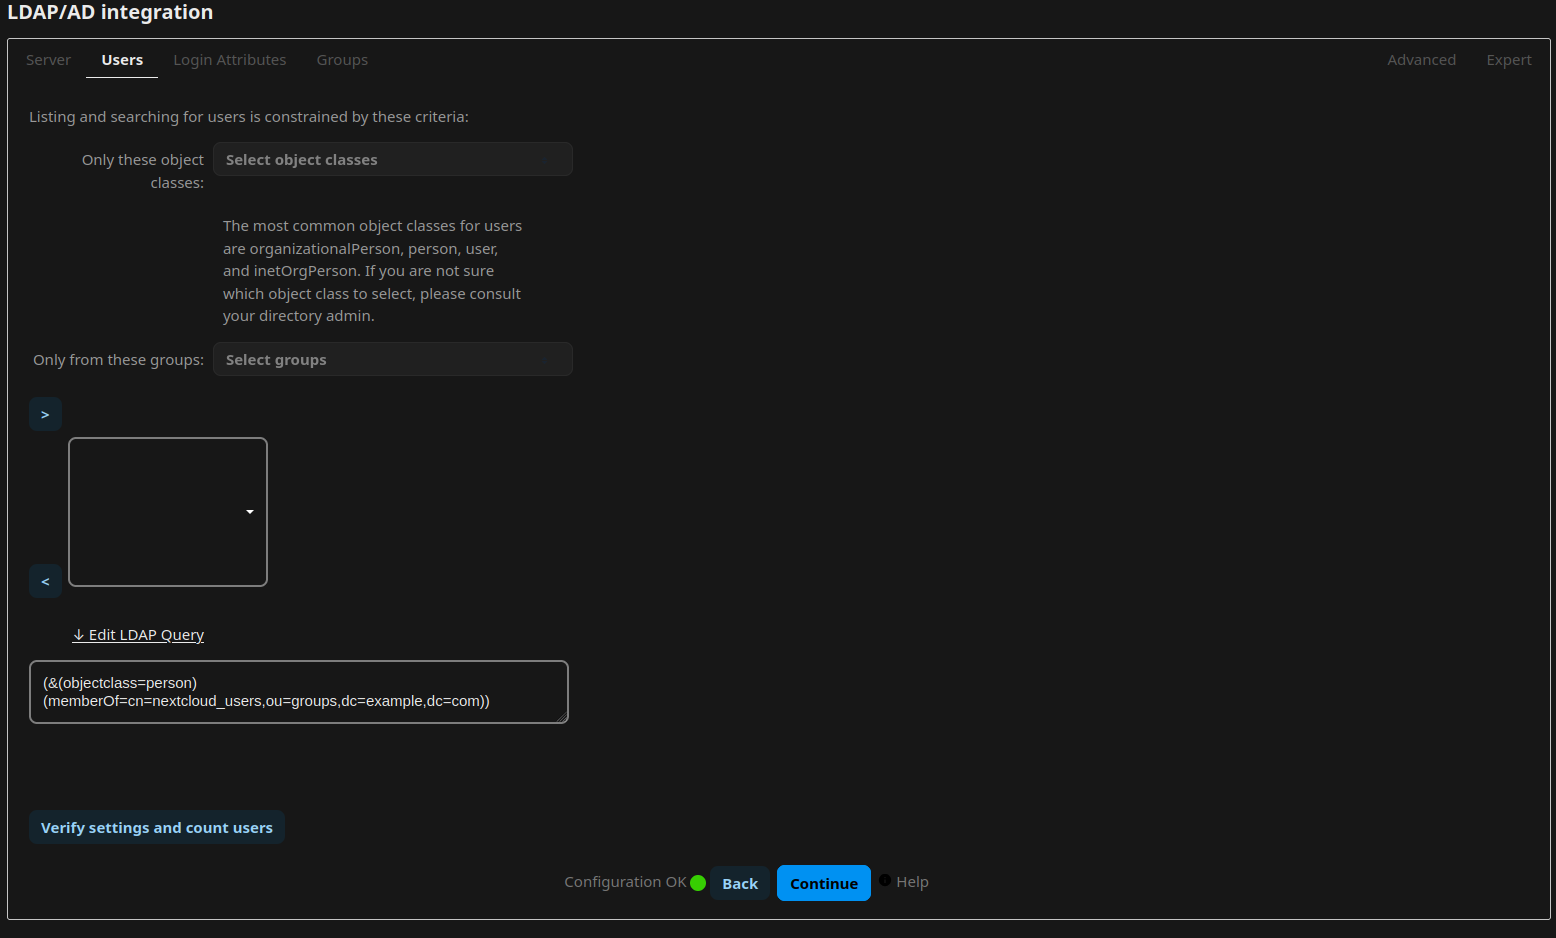
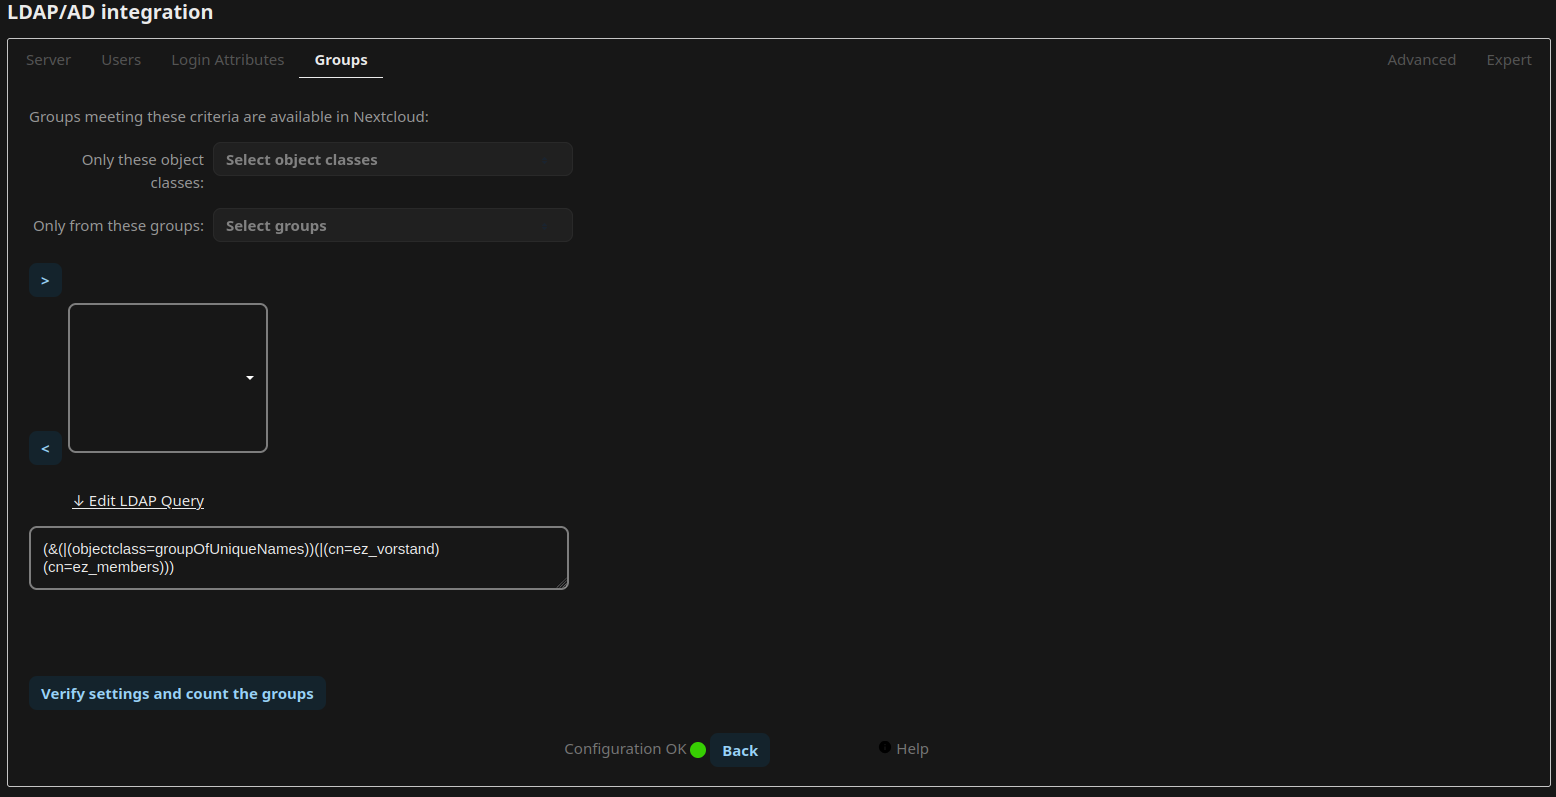
LDAP Integration
Install or activate the app “LDAP user and group backend”. Open the Administrative Settings and navigate to “LDAP/AD integration”. Now follow the guide from lldap on how to integrate nextcloud, or simply adopt the settings from the following screenshots:

Document Backend
Without a Document Backend, users won’t be able to edit office documents in Nextcloud. They would only be able to Up- and Download files. There are currently two available document backends: Collabora and OnlyOffice. Collabora is based on LibreOffice and the default choice for Nextcloud. But Collabora has no plans of supporting FreeBSD and attemps to port it to FreeBSD are currently stuck. OnlyOffice on the other hand, provides native FreeBSD packages. So we choose OnlyOffice.
Jail Setup
The document backend is a separate application intended to run on a separate host or container. So we are creating a jail for it:
bastille create onlyoffice 14.2-RELEASE 10.0.0.21/8 bastille0

# for PostgreSQL we need to set an additional option for the jail
bastille config onlyoffice set allow.sysvipc 1

# restart it for good measure
bastille restart onlyoffice
Lets install the packages required for this container and enable all the services these will install (we will also install micro to have an editor ready in the jail):
bastille pkg onlyoffice install onlyoffice-documentserver py311-importlib-resources py311-setuptools postgresql16-server micro

bastille sysrc onlyoffice postgresql_enable=YES
bastille sysrc onlyoffice nginx_enable=YES
bastille sysrc onlyoffice rabbitmq_enable=YES
bastille sysrc onlyoffice supervisord_enable=YES
Database
We will use Postgresql as the Database for OnlyOffice. Lets set it up now. We will have to execute quite a few commands and edit multiple files. It will be easier if we perform these steps directly in the jail. So let’s enter it:
bastille console onlyofficeFrom here, lets initialize the database:
service postgresql initdbWe need to tell postgres to listen on the ip of the jail. Edit the file /var/db/postgres/data16/pg_hba.conf and add the folowing at the end of the file. This will tell postgres to trust every connection coming from this address (the local jail).
|
|
We also need to edit /var/db/postgres/data16/postgres.conf to tell postgres to listen on this interface. Edit the file and change the line containing listen_addresses to the following:
|
|
Now we are ready to create and configure the database for onlyoffice:
service postgresql start
psql -U postgres -c "CREATE DATABASE onlyoffice;"
psql -U postgres -c "CREATE USER onlyoffice WITH password 'onlyoffice';"
psql -U postgres -c "GRANT ALL privileges ON DATABASE onlyoffice TO onlyoffice;"
psql -U postgres -c "ALTER DATABASE onlyoffice OWNER to onlyoffice;"
psql -h10.0.0.21 -Uonlyoffice -d onlyoffice -f /usr/local/www/onlyoffice/documentserver/server/schema/postgresql/createdb.sql
RabbitMQ
RabbitMQ provides a Message Queue which OnlyOffice depends on. We configure it as follows:
service rabbitmq start
rabbitmqctl --erlang-cookie `cat /var/db/rabbitmq/.erlang.cookie` add_user onlyoffice onlyoffice # usr=onlyoffice, pw=onlyoffice
rabbitmqctl --erlang-cookie `cat /var/db/rabbitmq/.erlang.cookie` set_user_tags onlyoffice administrator
rabbitmqctl --erlang-cookie `cat /var/db/rabbitmq/.erlang.cookie` set_permissions -p / onlyoffice ".*" ".*" ".*"
Documentserver
Now we are finally ready to configure the OnlyOffice Documentserver. We need to add our database and rabbitmq credentials to the configuratioon and add a specific block to set request-filtering-agent to allow requests from private ip addresses. You can edit the configuration with micro /usr/local/etc/onlyoffice/documentserver/local.json. Following is the content of this file, after adaption.
|
|
Open the supervisord configuration and add an include statement to include the onlyoffice supervisord files:
micro /usr/local/etc/supervisord.conf
|
|
Now we can start supervisord
service supervisord startnginx
OnlyOffice comes with pre-made configuration files for nginx. We will use this to expose it internally (but we still use our caddy reverse-proxy to expose it externally).
Lets edit /usr/local/etc/nginx/nginx.conf and on the line after http { enter the following include statement
|
|
There is already a server {} block in this file (inside the http { block). Remove the whole block.
Now run the following script:
documentserver-update-secureLink.shAfter the script has run, open /usr/local/etc/onlyoffice/documentserver/nginx/ds.conf and remove the line listen [::]:80 default_server;. Our jail does not have a ipv6 stack and this line will cause an error. After that, rerun the previous script
documentserver-update-secureLink.shNow the output should state that the config is sane and we are ready to start the nginx service
service nginx startWe now have everything set up in our onlyoffice-jail. Exit the shell to return to our hosts shell:
exitCaddy Configuration
To expose the documentserver open the Caddyfile of our reverse-proxy jail with micro /usr/local/bastille/jails/nextcloud/root/usr/local/etc/caddy/Caddyfile and add the following block:
|
|
And restart caddy:
bastille service caddy 'caddy restart'Nextcloud Configuration
Log in to Nextcloud as an admin and install the ONLYOFFICE app. Open the administrator settings and in the OnlyOffice settings add https://docs.<domain> as the Docs address. Input http://10.0.0.21 as the address for internal request and http://10.0.0.20 as the Nextcloud address for internal requests.